Set up Azure DevOps
Connecting an Azure DevOps cloud account is available for organizations using the dbt Cloud Enterprise tier.
dbt Cloud's native Azure DevOps integration does not support Azure DevOps Server (on-premise). Instead, you can import a project by git URL to connect to an Azure DevOps Server.
Overview
To use our native integration with Azure DevOps in dbt Cloud, an account admin needs to set up an Microsoft Entra ID app. We recommend setting up a separate Entra ID application than used for SSO.
- Register an Entra ID app.
- Add permissions to your new app.
- Add another redirect URI.
- Connect Azure DevOps to your new app.
- Add your Entra ID app to dbt Cloud.
Once the Microsoft Entra ID app is added to dbt Cloud, an account admin must also connect a service principal, which will be used to power headless actions in dbt Cloud such as deployment runs and CI.
Once the Microsoft Entra ID app is added to dbt Cloud and the service principal is connected, then dbt Cloud developers can personally authenticate in dbt Cloud from Azure DevOps. For more on this, see Authenticate with Azure DevOps.
The following personas are required to complete the steps on this page:
- Microsoft Entra ID admin
- Azure DevOps admin
- dbt Cloud account admin
- Azure admin (if your Entra ID and Azure DevOps environments are not connected)
Register a Microsoft Entra ID app
A Microsoft Entra ID admin needs to perform the following steps:
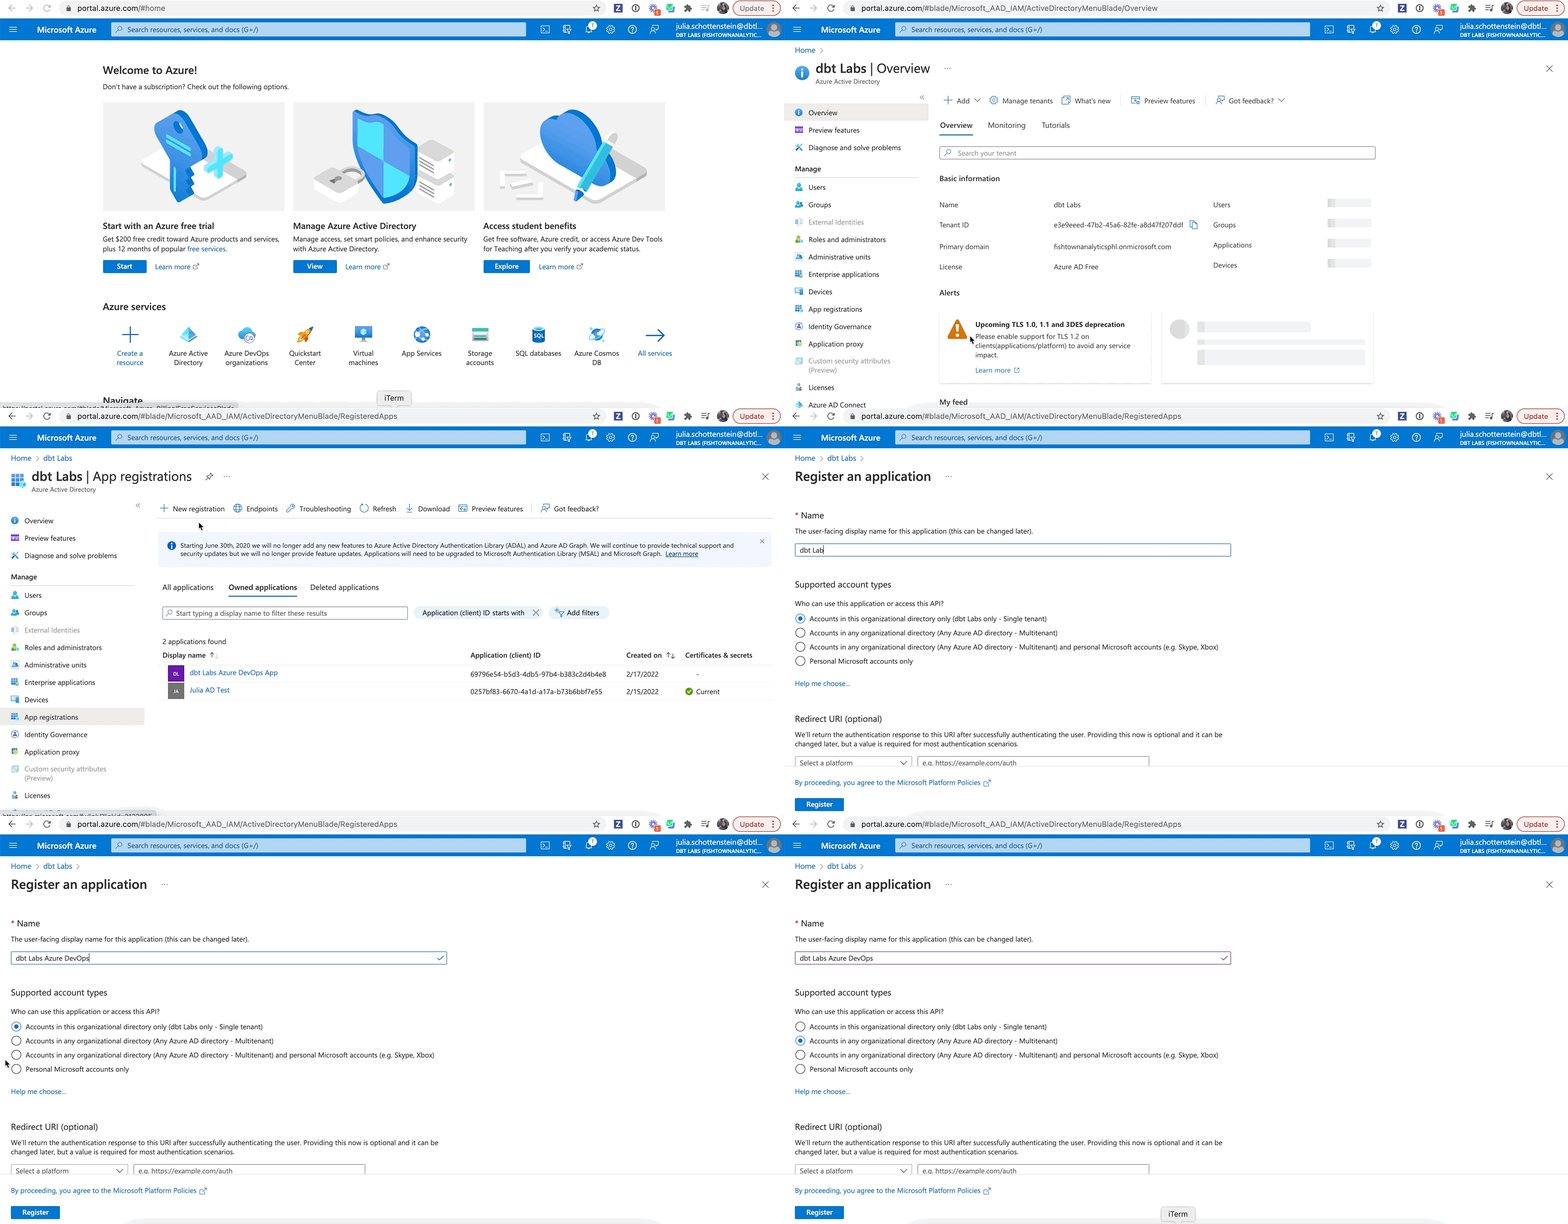
- Sign into your Azure portal and click Microsoft Entra ID.
- Select App registrations in the left panel.
- Select New registration. The form for creating a new Entra ID app opens.
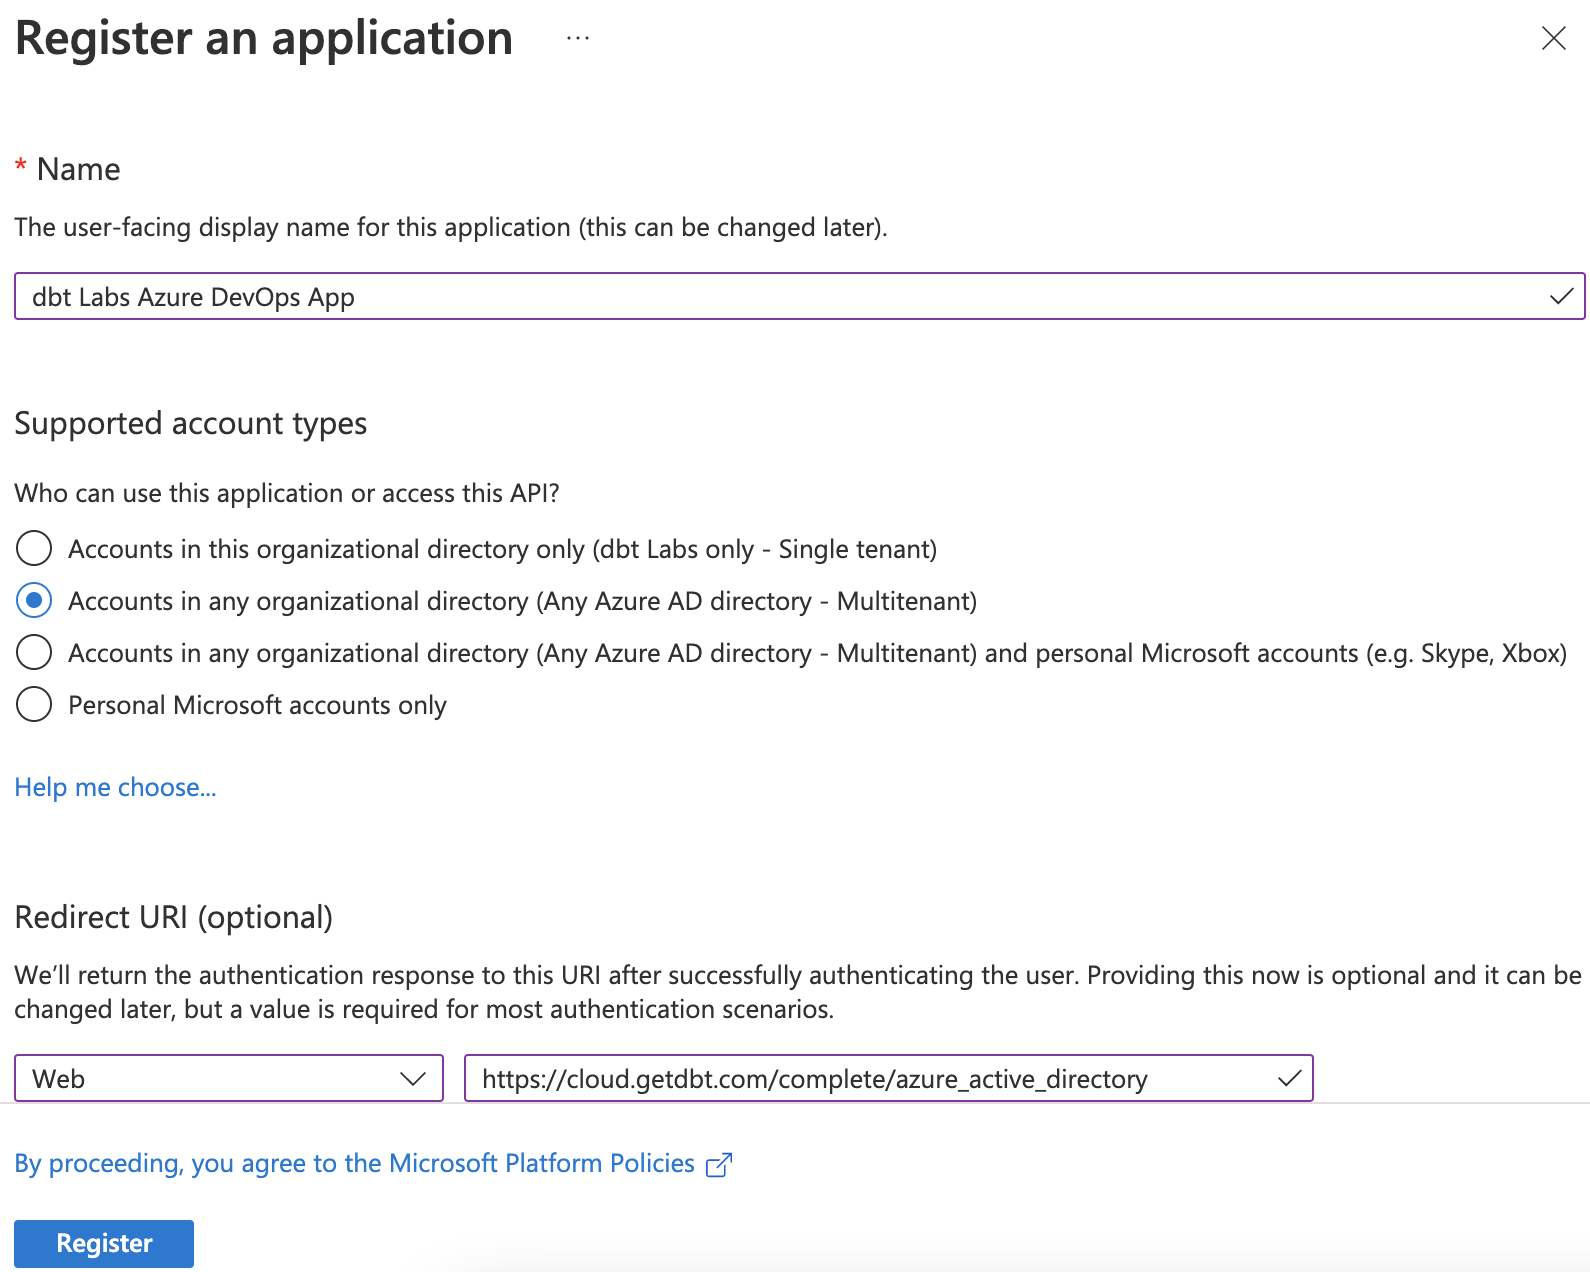
- Provide a name for your app. We recommend using, "dbt Labs Azure DevOps app".
- Select Accounts in any organizational directory (Any Entra ID directory - Multitenant) as the Supported Account Types. Many customers ask why they need to select Multitenant instead of Single tenant, and they frequently get this step wrong. Microsoft considers Azure DevOps (formerly called Visual Studio) and Microsoft Entra ID as separate tenants, and in order for this Entra ID application to work properly, you must select Multitenant.
- Add a redirect URI by selecting Web and, in the field, entering
https://YOUR_ACCESS_URL/complete/azure_active_directory, replacingYOUR_ACCESS_URLwith the appropriate Access URL for your region and plan. - Click Register.
Here's what your app should look like before registering it:
Add permissions to your new app
An Entra ID admin needs to provide your new app access to Azure DevOps:
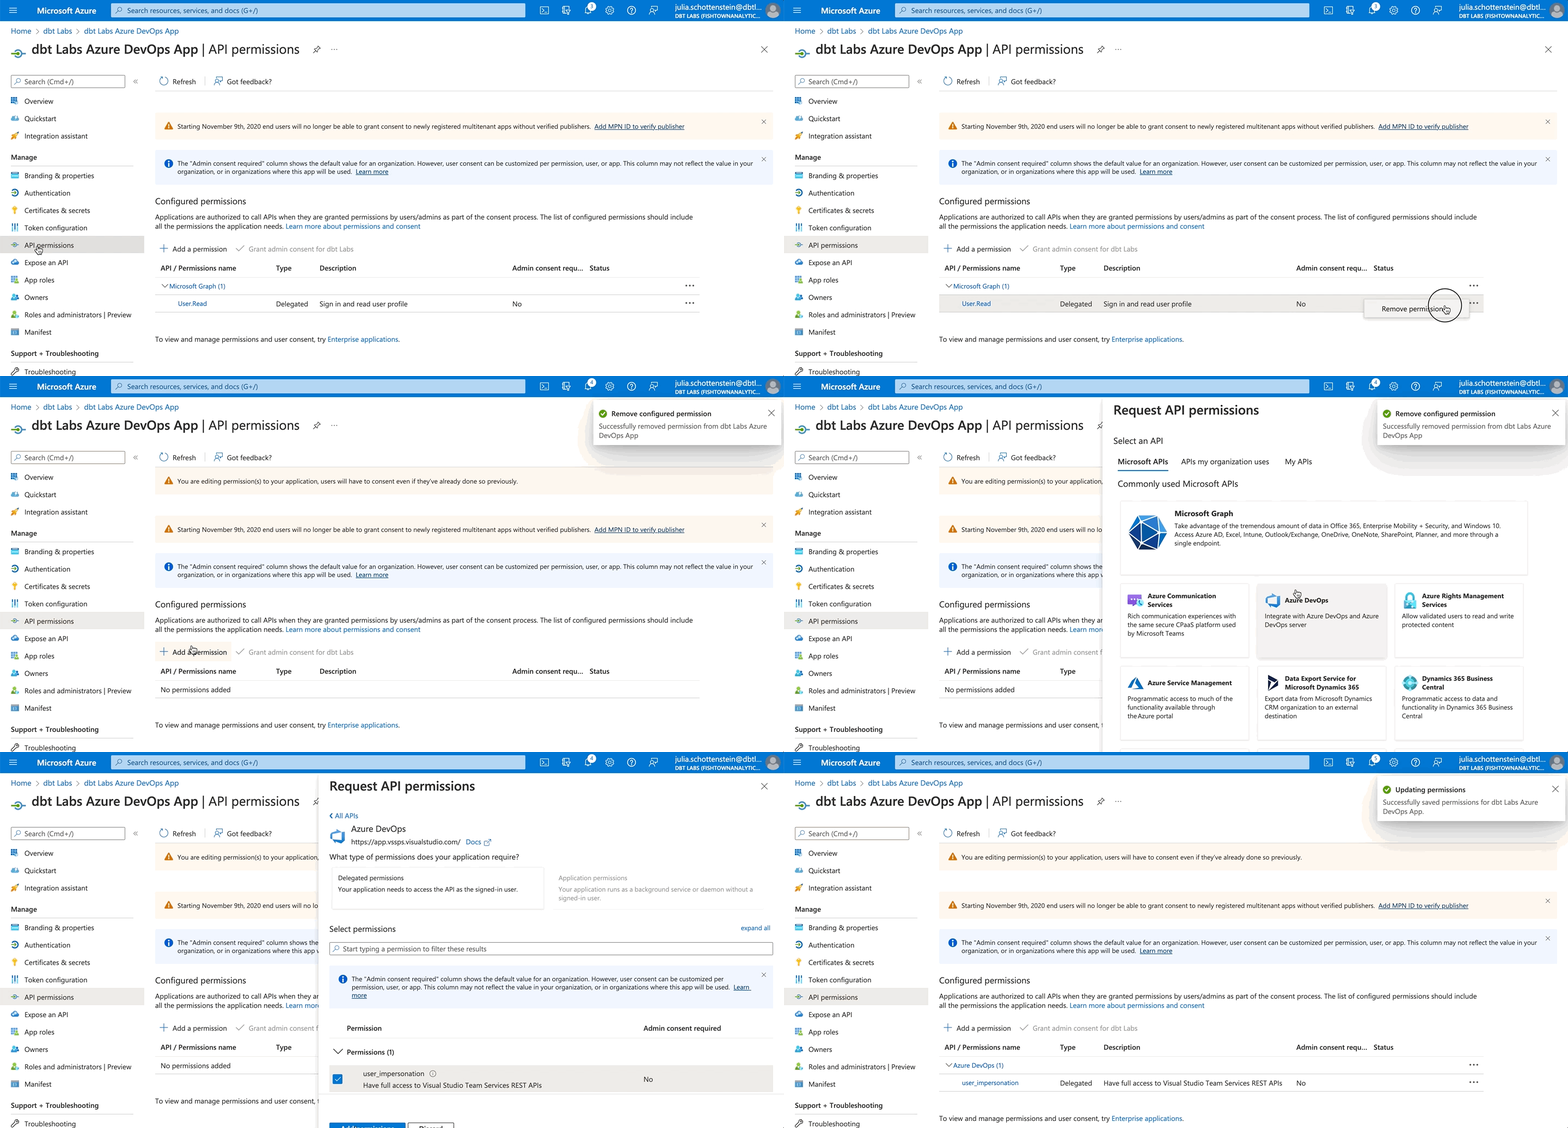
- Select API permissions in the left navigation panel.
- Remove the Microsoft Graph / User Read permission.
- Click Add a permission.
- Select Azure DevOps.
- Select the user_impersonation permission. This is the only permission available for Azure DevOps.
Add another redirect URI
A Microsoft Entra ID admin needs to add another redirect URI to your Entra ID application. This redirect URI will be used to authenticate the service principal for headless actions in deployment environments.
-
Navigate to your Microsoft Entra ID application.
-
Select the link next to Redirect URIs
-
Click Add URI and add the URI, replacing
YOUR_ACCESS_URLwith the appropriate Access URL for your region and plan:https://YOUR_ACCESS_URL/complete/azure_active_directory_service_principal -
Click Save.
Create a client secret
A Microsoft Entra ID admin needs to complete the following steps:
- Navigate to Microsoft Entra ID, click App registrations, and click on your app.
- Select Certificates and Secrets from the left navigation panel.
- Select Client secrets and click New client secret
- Give the secret a description and select the expiration time. Click Add.
- Copy the Value field and securely share it with the dbt Cloud account admin who will complete the setup.
Connect Azure DevOps to your new app
An Azure admin will need one of the following permissions in both the Microsoft Entra ID and Azure DevOps environments:
- Azure Service Administrator
- Azure Co-administrator
If your Azure DevOps account is connected to Entra ID, then you can proceed to Connect a service principal. However, if you're just getting set up, connect Azure DevOps to the Microsoft Entra ID app you just created:
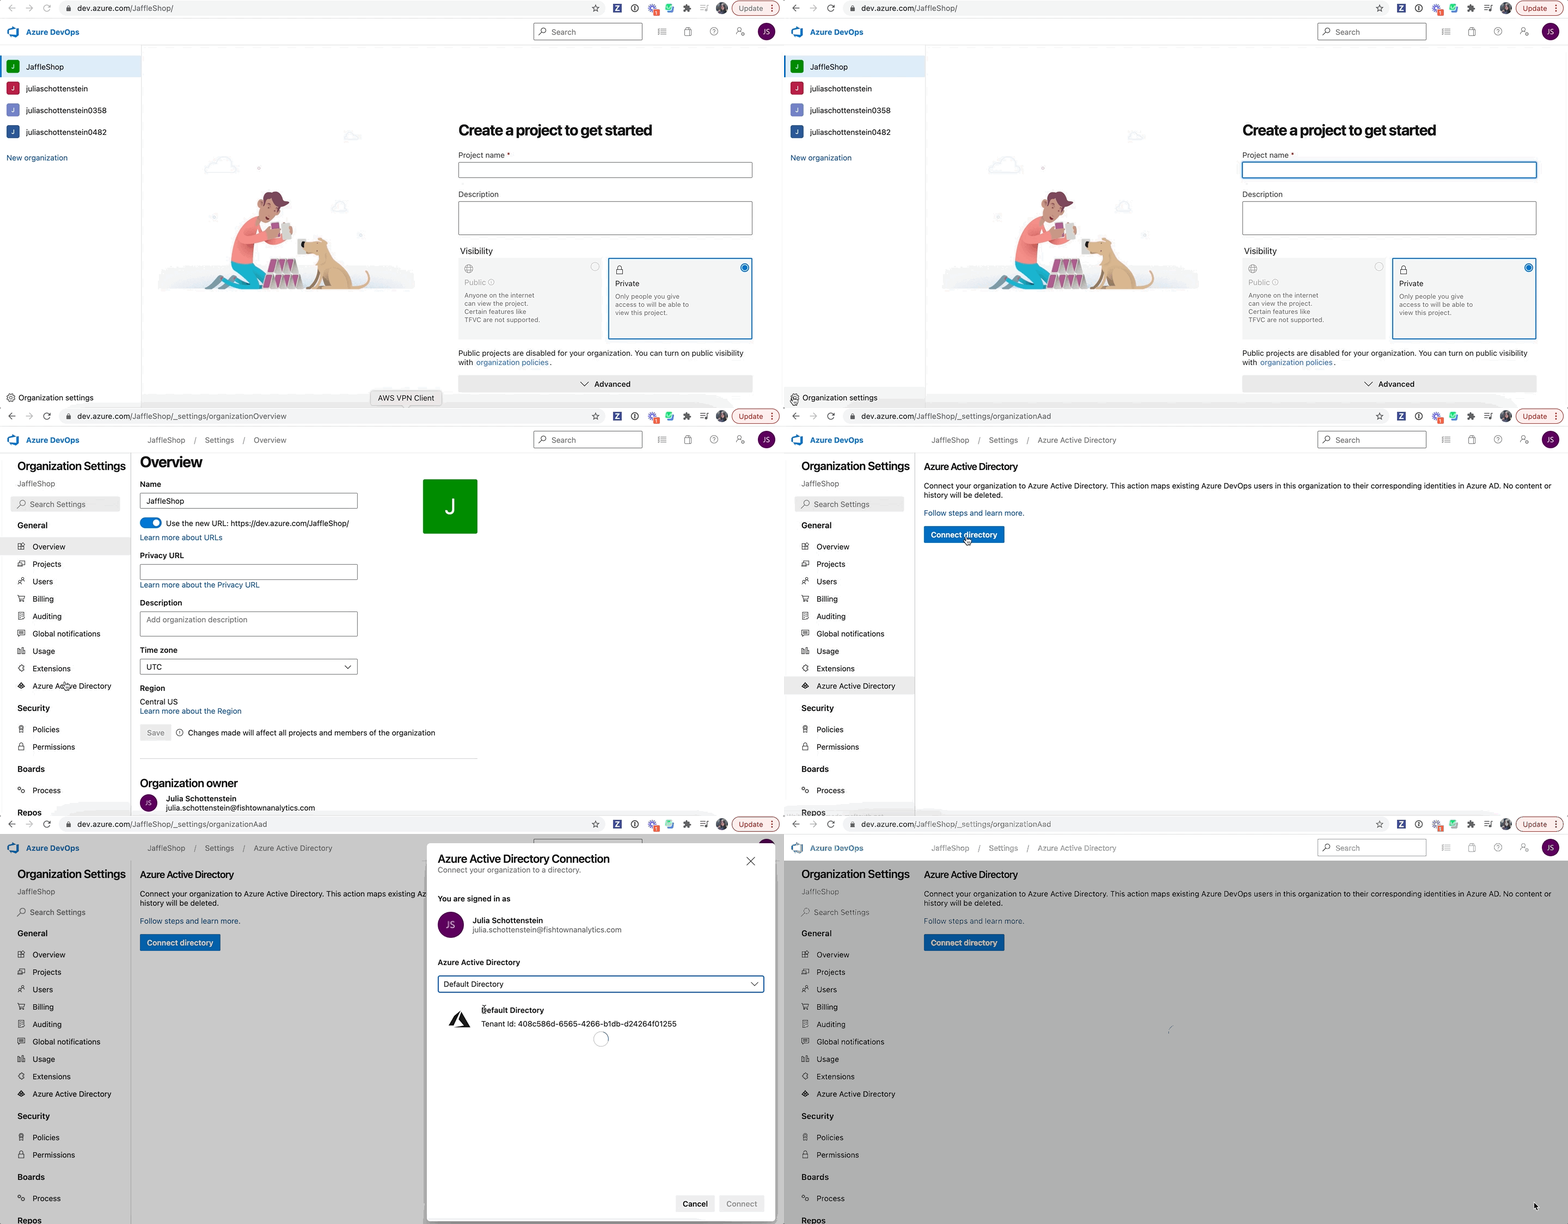
- From your Azure DevOps account, select Organization settings in the bottom left.
- Navigate to Microsoft Entra ID.
- Click Connect directory.
- Select the directory you want to connect.
- Click Connect.
Configure the Entra ID connection
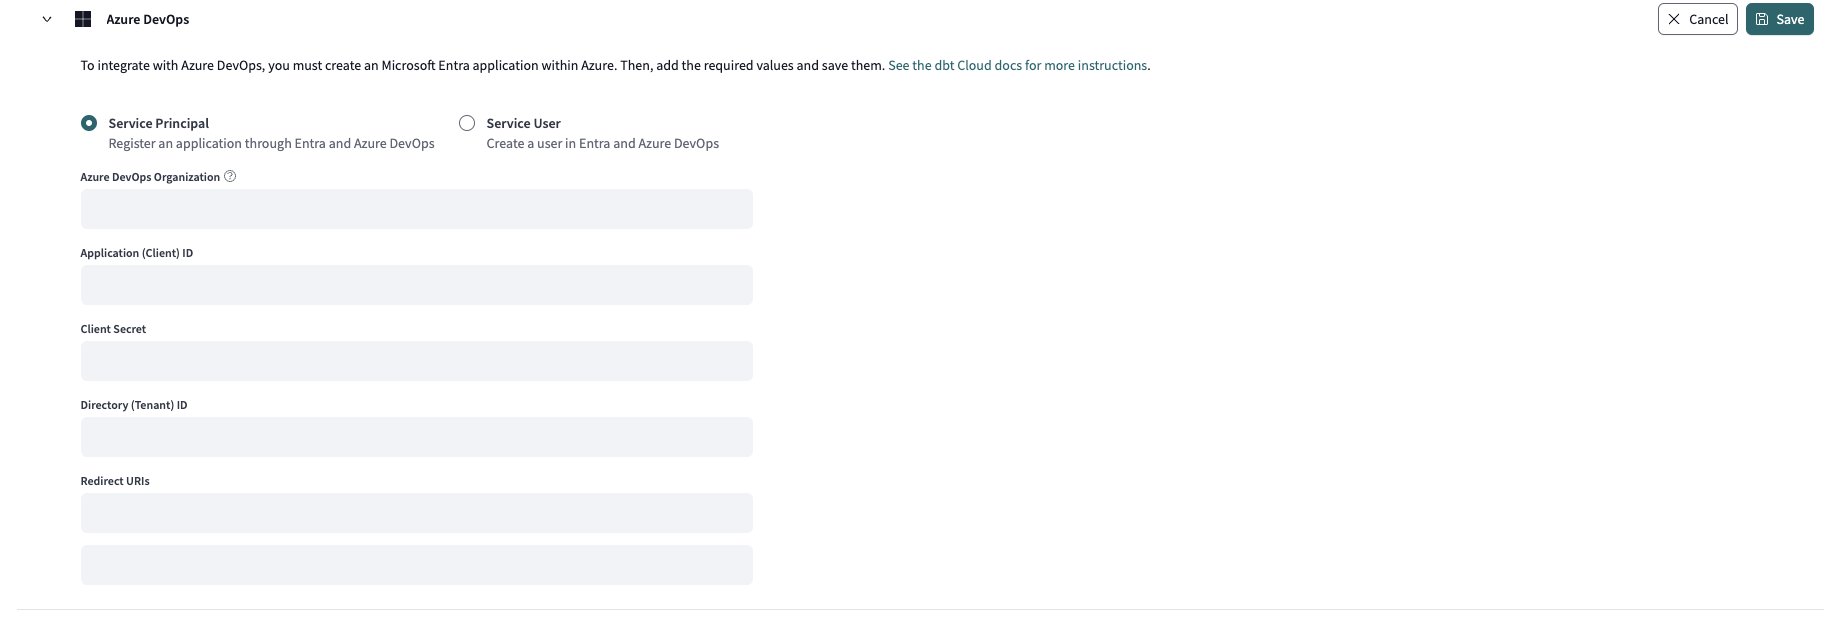
There are two connection methods currently available for dbt Cloud and Azure DevOps:
- Service principal (recommended): Create an application connection via client ID and secret for unattended authentication.
- Service user (legacy): Create a user that will authenticate the connection with username and password. This configuration should be avoided.
- Service principal
- Service user
Create a service principal
The application's service principal represents the Entra ID application object. Whereas a service user represents a real user in Azure with an Entra ID (and an applicable license), the service principal is a secure identity used by an application to access Azure resources unattended. The service principal authenticates with a client ID and secret rather than a username and password (or any other form of user auth). Service principals are the Microsoft recommended method for authenticating apps.
Add a role to the Service Principal
You can create a new role or assign an existing one to the service principal app. It must have the following permissions:
- Project Reader
- ViewSubscriptions
- EditSubscriptions
- DeleteSubscriptions *
- PullRequestContribute
- GenericContribute
In your Azure account:
- Navigate to Subscriptions and click on the appropriate subscription name for the application environment.
- From the left-side menu of the subscription window, click Access control (IAM).
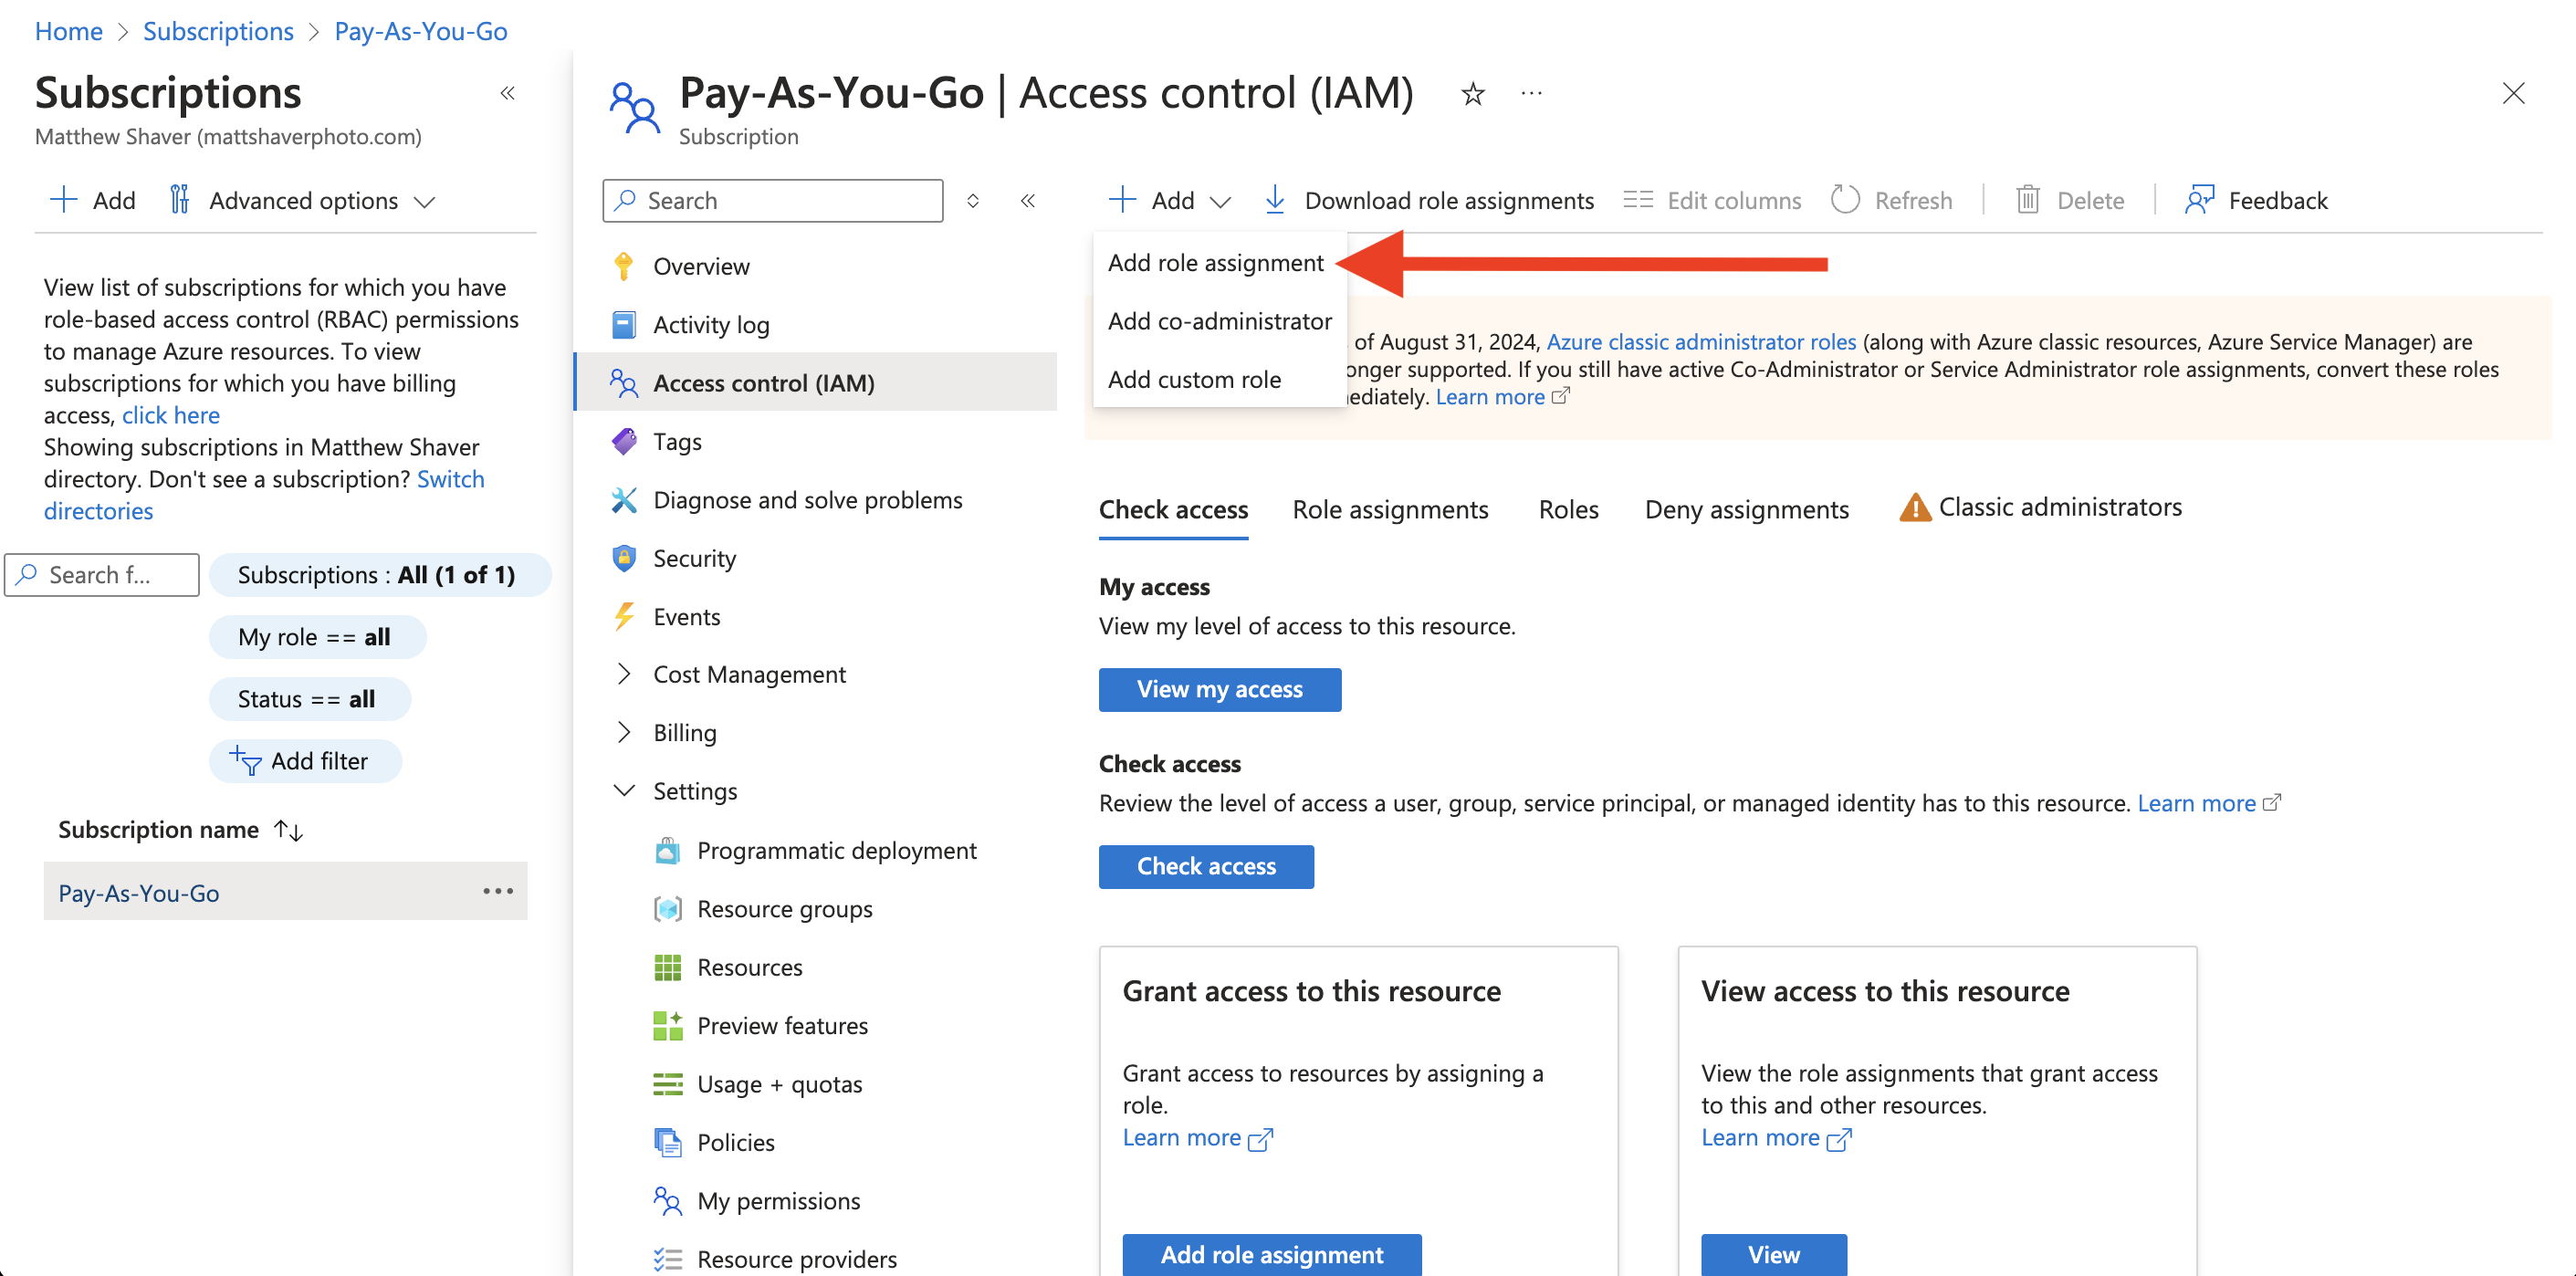
- From the top menu, click Add and select Add role assignment from the dropdown.
-
In the Role tab, select a role with appropriate permissions to assign the service principal.
-
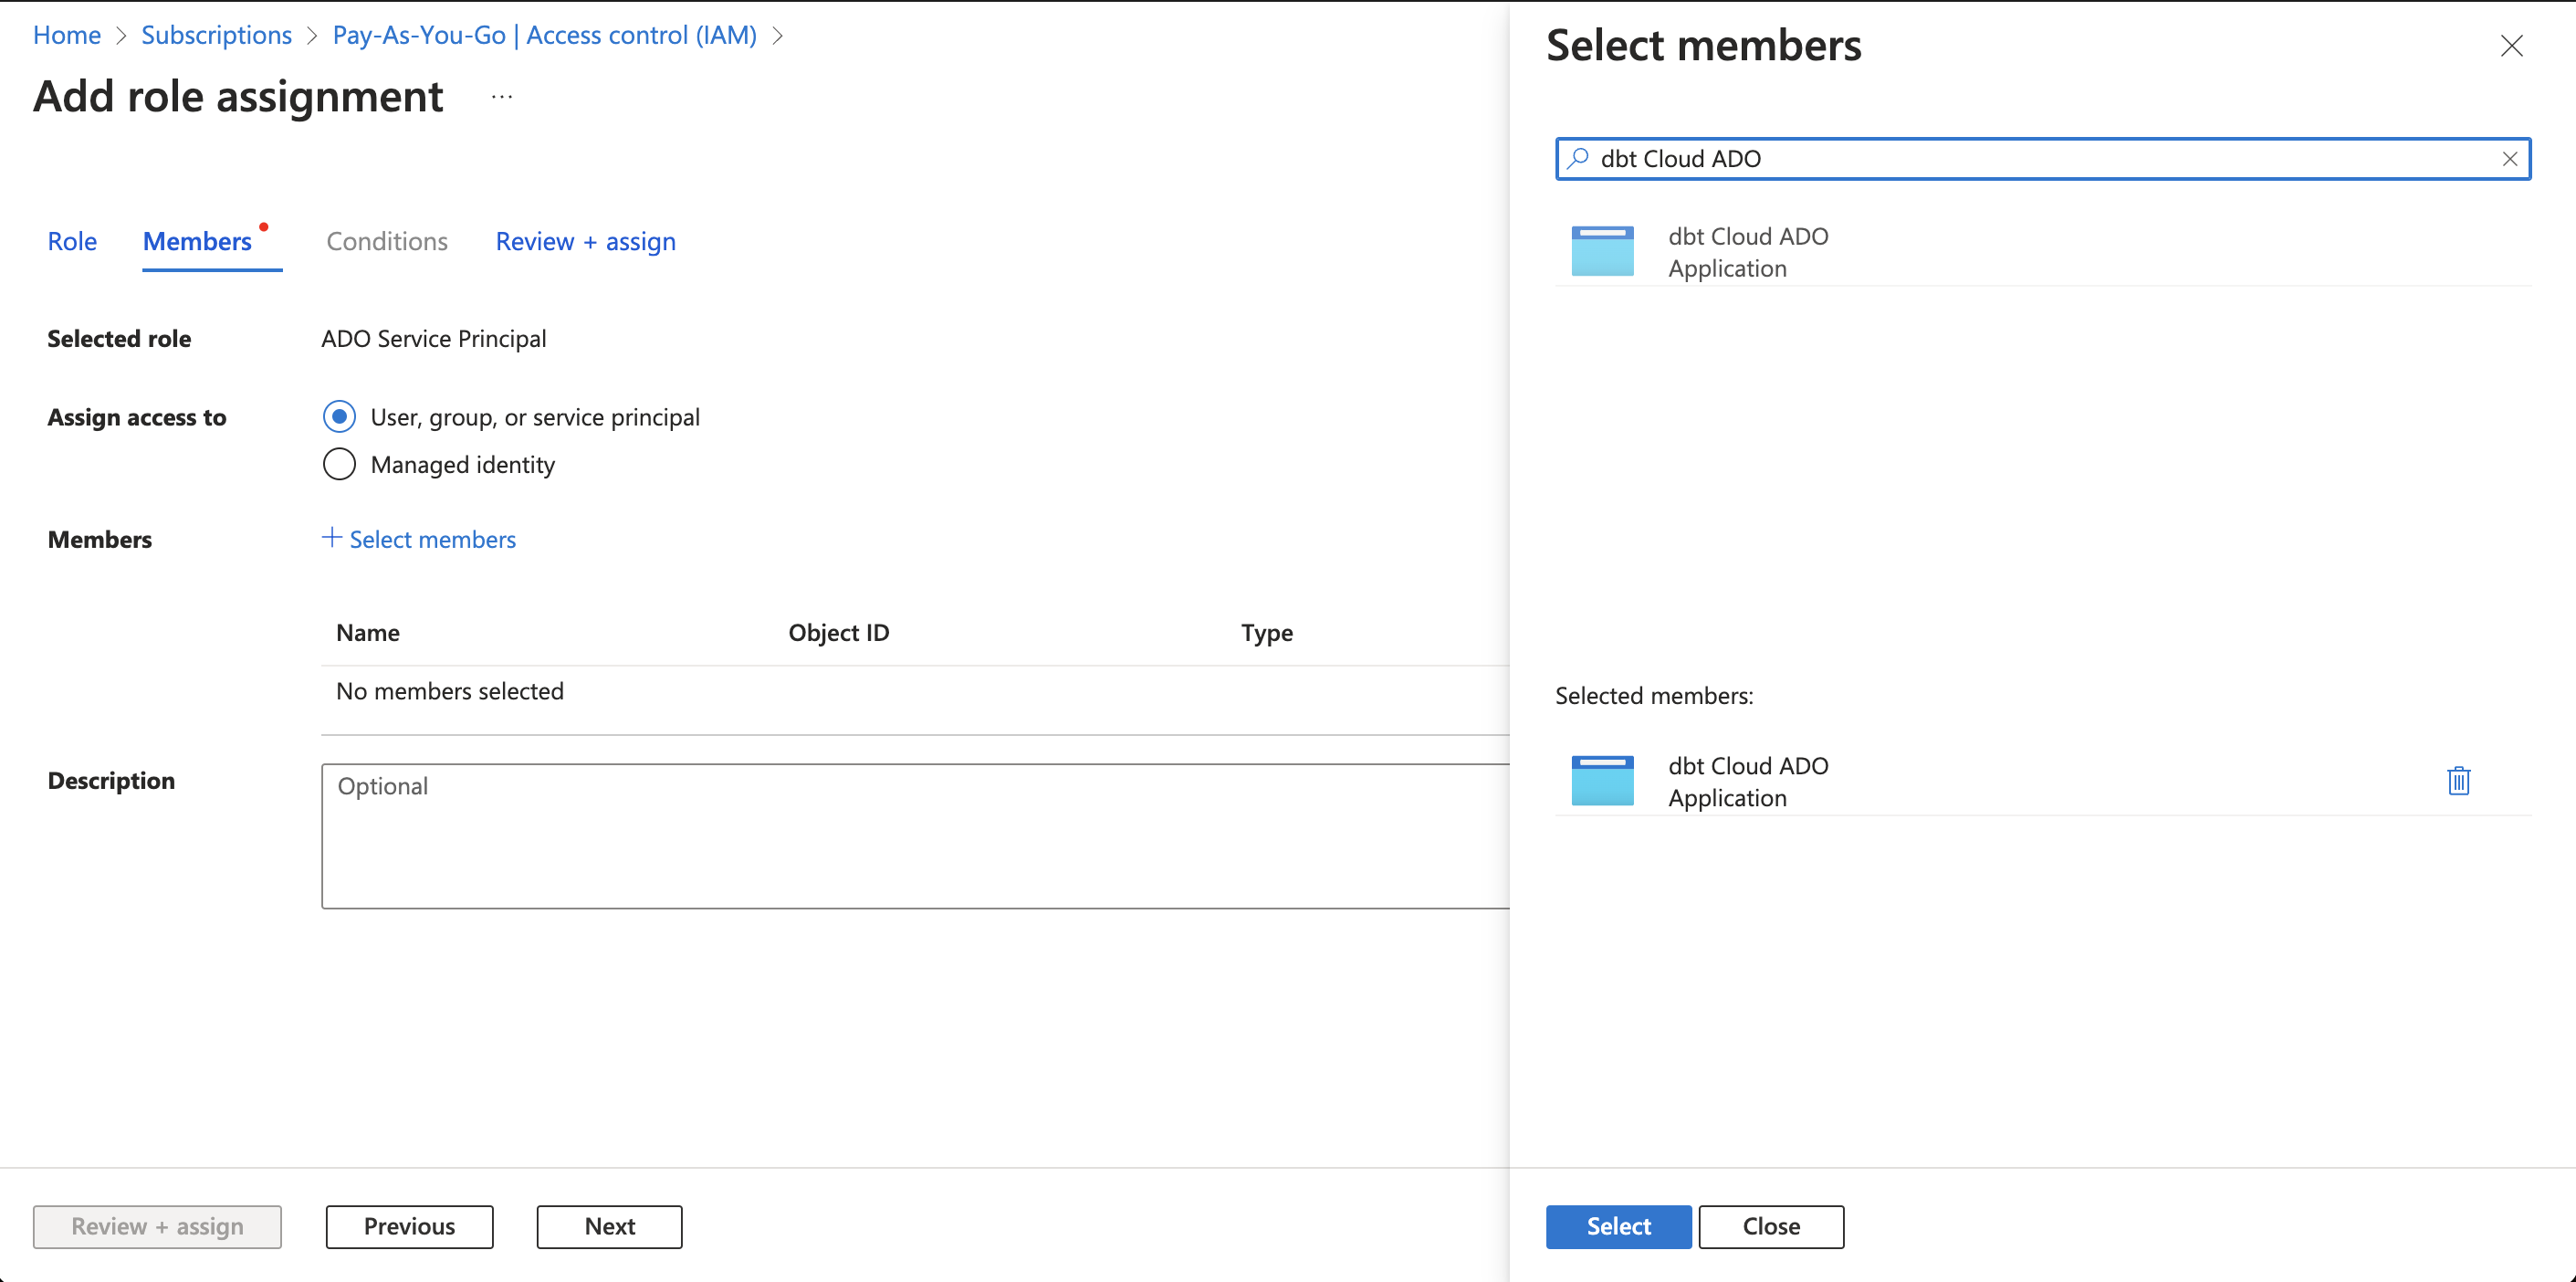
Click the Members tab. You must set Assign access to to User, group, or service principal.
-
Click Select members and search for your app name in the window. Once it appears, click your app, which will appear in the Selected members section. Click Select at the bottom to save your selection.
-
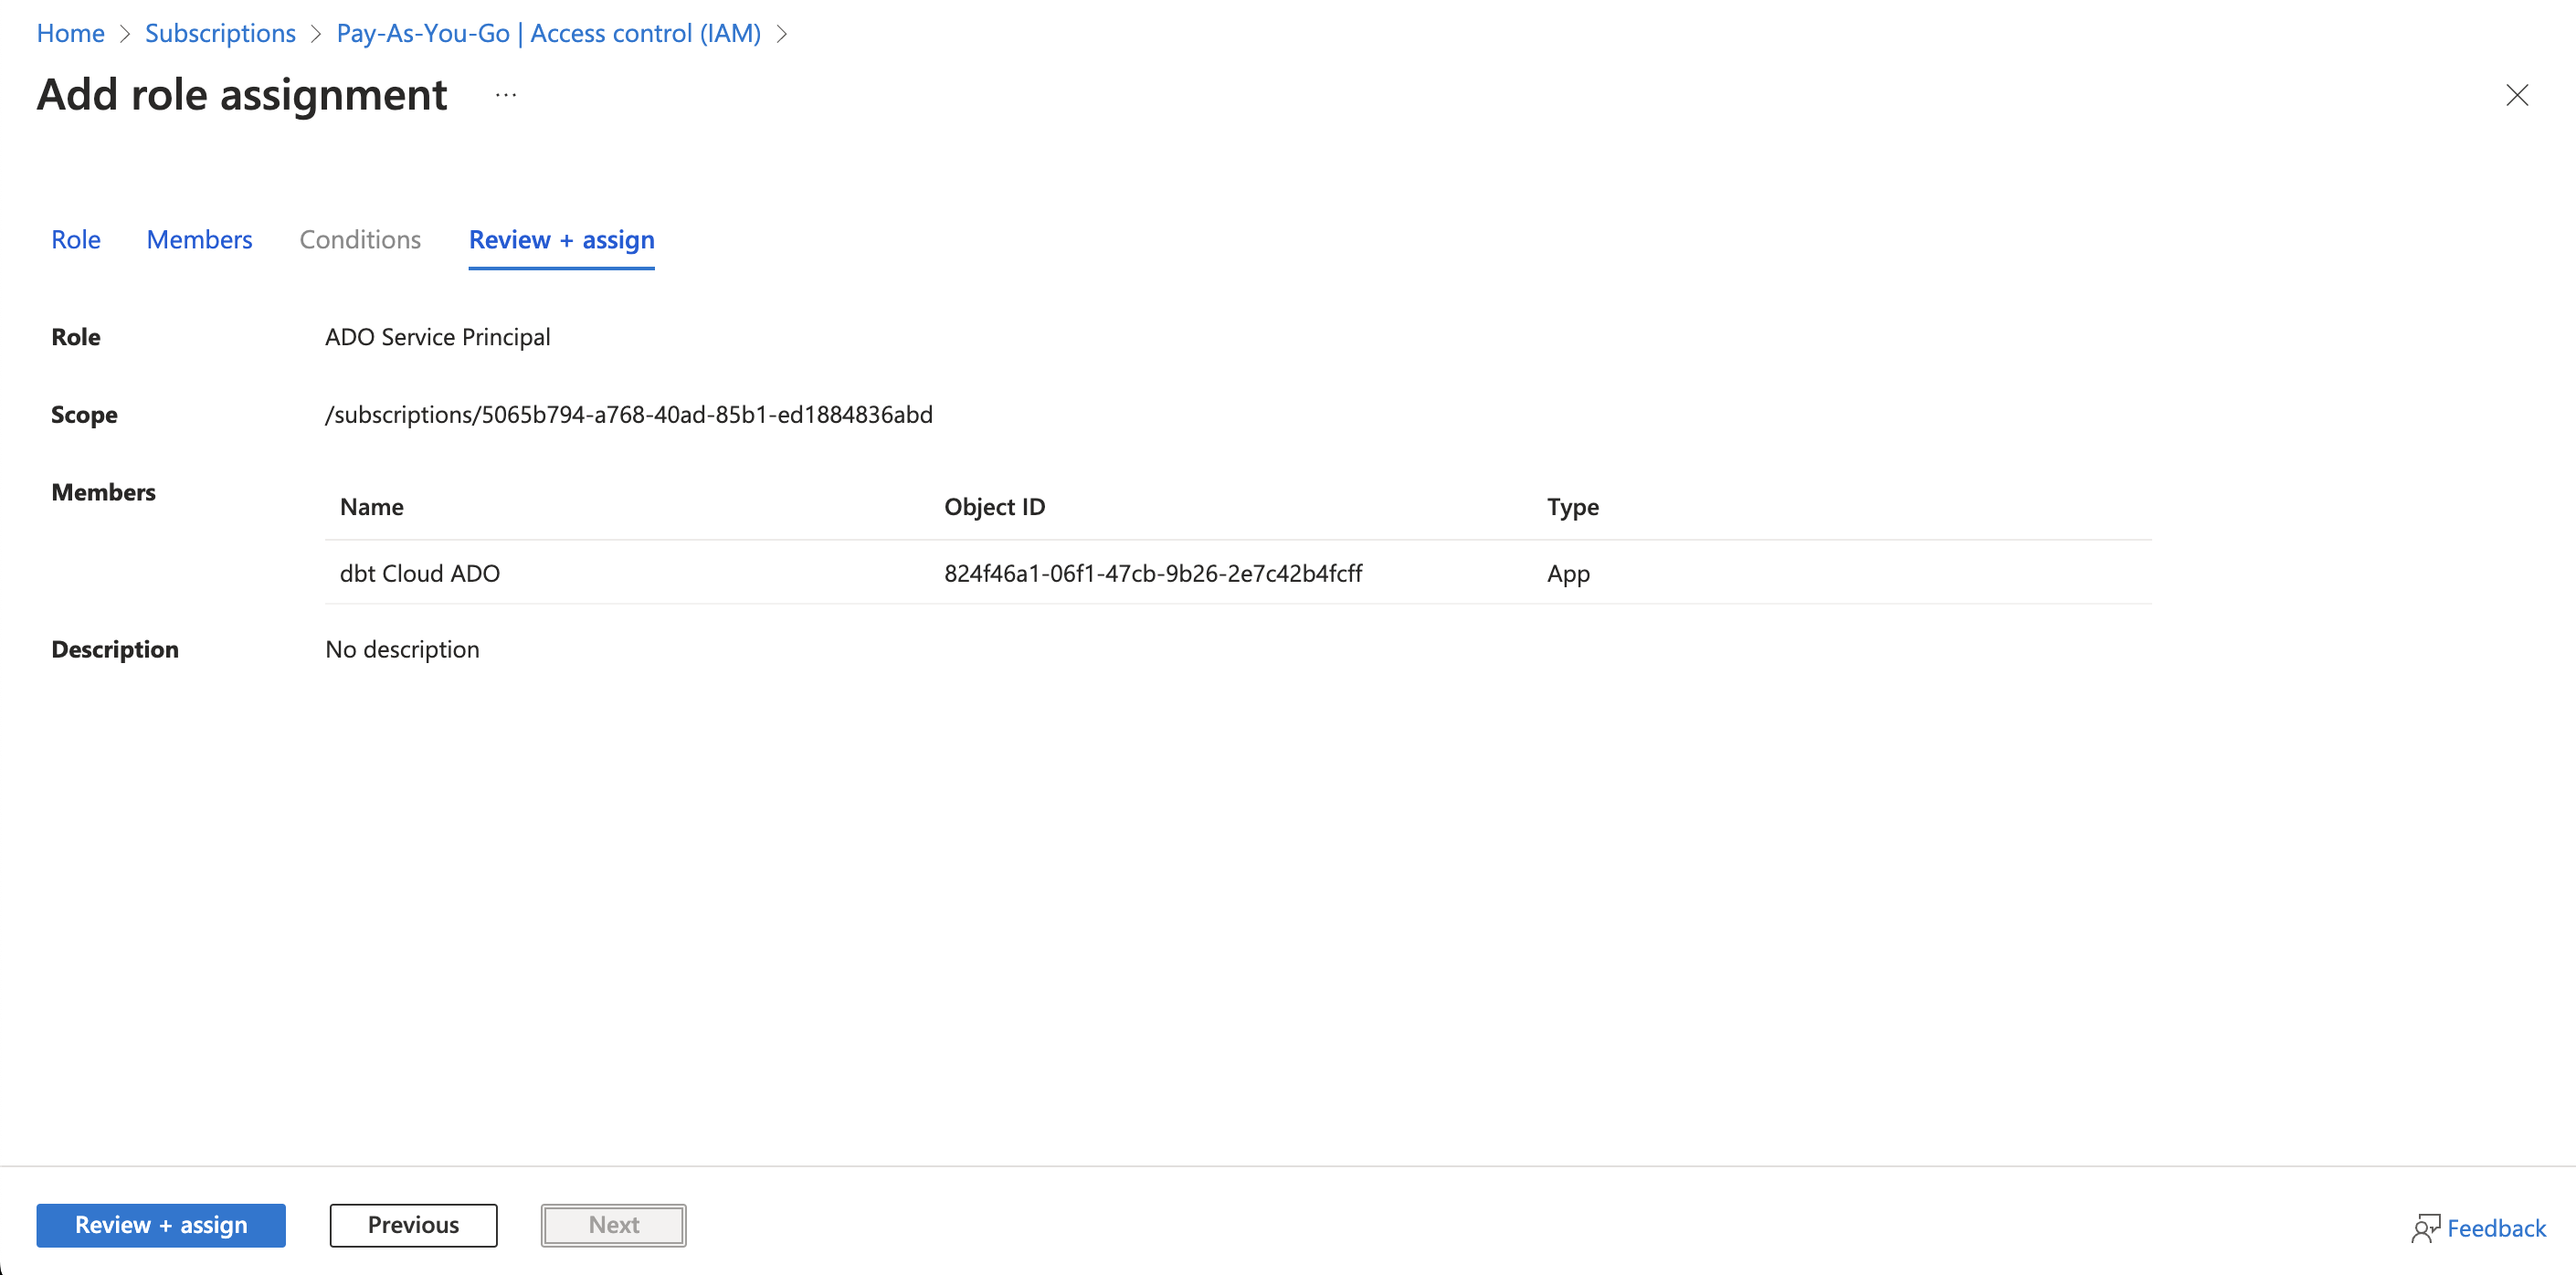
Confirm the details are correct and click Review + assign.
Navigate back to the App registrations screen and click the app. On the left menu, click Roles and administrators and you will see the app role assignment.
Migrate to service principal
If your dbt Cloud app does not have a service principal, take the following actions in your Azure account:
-
Navigate to Microsoft Entra ID.
-
Under Manage on the left-side menu, click App registrations.
-
Click the app for the dbt Cloud and Azure DevOps integration.
-
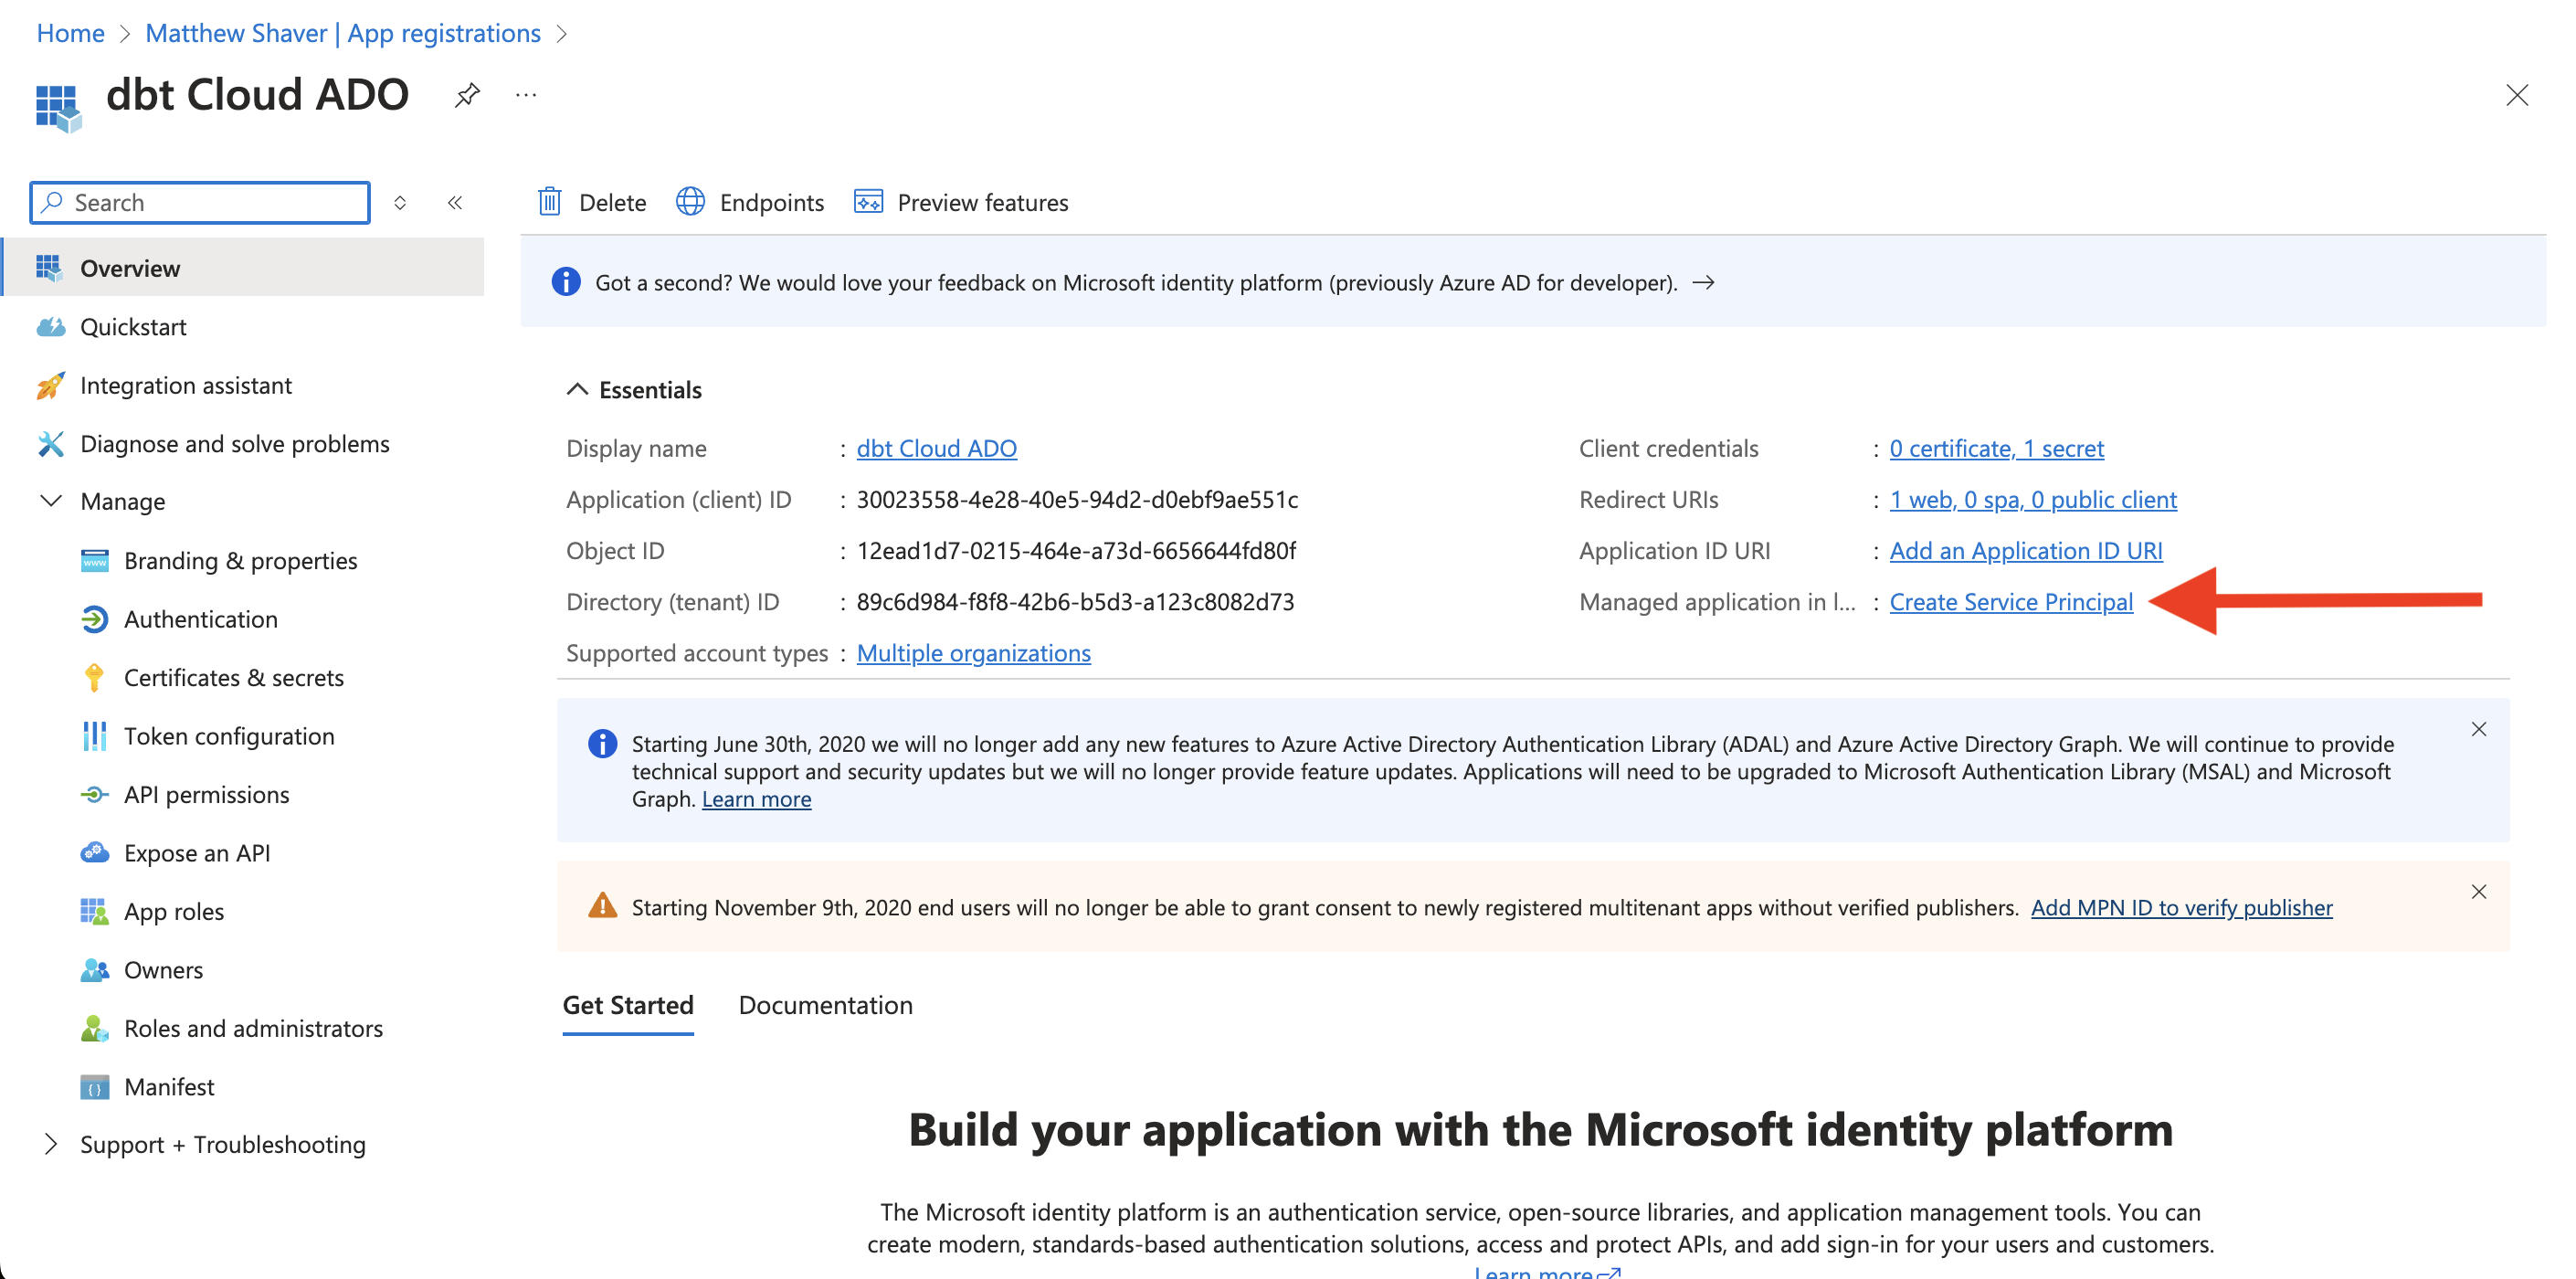
Locate the Managed application in local directory field and click Create Service Principal.
-
Follow the instructions in Add role to service principal.
-
In dbt Cloud, navigate to Account settings --> Integrations and edit the Azure DevOps integration.
Service users are no longer a recommended method for authentication and accounts using them should migrate to Entra ID service principals in the future. Service prinicpals are the Microsoft recommended service account type for app authentication.
An Azure DevOps admin can create a "service user (not recommended)" in Azure DevOps whose permissions will be used to power headless actions in dbt Cloud such as dbt Cloud project repo selection, deployment runs, and CI. A service user is a pseudo user set up in the same way an admin would set up a real user, but it's given permissions specifically scoped for service to service interactions. You should avoid linking authentication to a real Azure DevOps user because if this person leaves your organization, dbt Cloud will lose privileges to the dbt Azure DevOps repositories, causing production runs to fail.
dbt Cloud will refresh the authentication for the service user on each run triggered by the scheduler, API, or CI. If your account does not have any active runs for over 90 days, an admin will need to manually refresh the authentication of the service user by disconnecting and reconnecting the service user's profile via the OAuth flow described above in order to resume headless interactions like project set up, deployment runs, and CI.
Service users permissions
A service user account must have the following Azure DevOps permissions for all Azure DevOps projects and repos you want accessible in dbt Cloud. Read more about how dbt Cloud uses each permission in the following paragraphs.
- Project Reader
- ViewSubscriptions
- EditSubscriptions
- DeleteSubscriptions *
- PullRequestContribute
- GenericContribute
* Note: DeleteSubscriptions permission might be included in EditSubscriptions depending on your version of Azure.
Some of these permissions are only accessible via the Azure DevOps API or CLI. We’ve also detailed more information on Azure DevOps API usage below to help accelerate the setup. Alternatively, you can use the Azure DevOps UI to enable permissions, but you cannot get the least permissioned set.
- Required permissions for service users
- Turn off MFA for service user
The service user's permissions will also power which repositories a team can select from during dbt project set up, so an Azure DevOps admin must grant at minimum Project Reader access to the service user before creating a new project in dbt Cloud. If you are migrating an existing dbt project to use the native Azure DevOps integration, the dbt Cloud account's service user must have proper permissions on the repository before migration.
While it's common to enforce multi-factor authentication (MFA) for normal user accounts, service user authentication must not need an extra factor. If you enable a second factor for the service user, this can interrupt production runs and cause a failure to clone the repository. In order for the OAuth access token to work, the best practice is to remove any more burden of proof of identity for service users.
As a result, MFA must be explicity disabled in the Office 365 or Microsoft Entra ID administration panel for the service user. Just having it "un-connected" will not be sufficient, as dbt Cloud will be prompted to set up MFA instead of allowing the credentials to be used as intended.
To disable MFA for a single user using the Office 365 Administration console:
- Go to Microsoft 365 admin center -> Users -> Active users -> Select the user -> Manage multifactor authentication -> Select the user -> Disable multi-factor authentication.
To use the Microsoft Entra ID interface:
Note, this procedure involves disabling Security Defaults in your Entra ID environment.
- Go to the Azure Admin Center. Open Microsoft Entra ID and under the Manage section of the left navigation, click Properties, scroll down to Manage Security defaults, and then select No in "Enable Security Defaults" and click Save.
- Go to Microsoft Entra ID -> Manage -> Users ->click on the ellipsis (...) and then the Multi-Factor Authentication link. If the link is grayed out, you need to make sure you disable Security Defaults from the previous step.
- If MFA is enabled for users, select the user(s) and select Disable under Quick steps.
- Select Yes to confirm your changes.
To re-enable MFA for the user, select them again and click Enable. Note, you may have to go through MFA setup for that user after enabling it.
ViewSubscriptions
Security Namespace ID: cb594ebe-87dd-4fc9-ac2c-6a10a4c92046
Namespace: ServiceHooks
Permission:
{
    "bit": 1,
    "displayName": "View Subscriptions",
    "name": "ViewSubscriptions"
}
Uses: To view existing Azure DevOps service hooks subscriptions
Token (where applicable - API only):
- PublisherSecurity for access to all projects
- PublisherSecurity/<azure_devops_project_object_id> for per project access
UI/API/CLI: API/CLI only
Sample CLI code snippet
az devops security permission update --organization https://dev.azure.com/<org_name> --namespace-id cb594ebe-87dd-4fc9-ac2c-6a10a4c92046 --subject <service_account>@xxxxxx.onmicrosoft.com --token PublisherSecurity/<azure_devops_project_object_id> --allow-bit 1
EditSubscriptions
Security Namespace ID: cb594ebe-87dd-4fc9-ac2c-6a10a4c92046
Namespace: ServiceHooks
Permission:
{
    "bit": 2,
    "displayName": "Edit Subscription",
    "name": "EditSubscriptions"
}
Uses: To add or update existing Azure DevOps service hooks subscriptions
Token (where applicable - API only):
- PublisherSecurity for access to all projects
- PublisherSecurity/<azure_devops_project_object_id> for per project access
UI/API/CLI: API/CLI only
Sample CLI code snippet
az devops security permission update --organization https://dev.azure.com/<org_name> --namespace-id cb594ebe-87dd-4fc9-ac2c-6a10a4c92046 --subject <service_account>@xxxxxx.onmicrosoft.com --token PublisherSecurity/<azure_devops_project_object_id> --allow-bit 2
DeleteSubscriptions
Security Namespace ID: cb594ebe-87dd-4fc9-ac2c-6a10a4c92046
Namespace: ServiceHooks
Permission:
{
    "bit": 4,
    "displayName": "Delete Subscriptions",
    "name": "DeleteSubscriptions"
}
Uses: To delete any redundant Azure DevOps service hooks subscriptions
Token (where applicable - API only):
- PublisherSecurity for access to all projects
- PublisherSecurity/<azure_devops_project_object_id> for per project access
UI/API/CLI: API/CLI only
Sample CLI code snippet
az devops security permission update --organization https://dev.azure.com/<org_name> --namespace-id cb594ebe-87dd-4fc9-ac2c-6a10a4c92046 --subject <service_account>@xxxxxx.onmicrosoft.com --token PublisherSecurity/<azure_devops_project_object_id> --allow-bit 4
Additional Notes: This permission has been deprecated in recent Azure DevOps versions. Edit Subscriptions (bit 2) has Delete permissions.
PullRequestContribute
Security Namespace ID: 2e9eb7ed-3c0a-47d4-87c1-0ffdd275fd87
Namespace: Git Repositories
Permission:
{
    "bit": 16384,
    "displayName": "Contribute to pull requests",
    "name": "PullRequestContribute"
}
Uses: To post Pull Request statuses to Azure DevOps
Token (where applicable - API only):
- repoV2 for access to all projects
- repoV2/<azure_devops_project_object_id> for per project access
- repoV2/<azure_devops_project_object_id>/<azure_devops_repository_object_id> for per repo access
UI/API/CLI: UI, API, and CLI
Sample CLI code snippet
az devops security permission update --organization https://dev.azure.com/<org_name> --namespace-id 2e9eb7ed-3c0a-47d4-87c1-0ffdd275fd87 --subject <service_account>@xxxxxx.onmicrosoft.com --token repoV2/<azure_devops_project_object_id>/<azure_devops_repository_object_id> --allow-bit 16384
Additional Notes: This permission is automatically inherited if Project Reader/Contributor/Administrator is set in the UI.
GenericContribute
Security Namespace ID: 2e9eb7ed-3c0a-47d4-87c1-0ffdd275fd87
Namespace: Git Repositories
Permission:
{
    "bit": 4,
    "displayName": "Contribute",
    "name": "GenericContribute"
}
Uses: To post commit statuses to Azure DevOps
Token (where applicable - API only):
- repoV2 for access to all projects
- repoV2/<azure_devops_project_object_id> for access to a single project at a time
- repoV2/<azure_devops_project_object_id>/<azure_devops_repository_object_id> for access to a single repo at a time
UI/API/CLI: UI, API, and CLI
Sample CLI code snippet
az devops security permission update --organization https://dev.azure.com/<org_name> --namespace-id 2e9eb7ed-3c0a-47d4-87c1-0ffdd275fd87 --subject <service_account>@xxxxxx.onmicrosoft.com --token repoV2/<azure_devops_project_object_id>/<azure_devops_repository_object_id> --allow-bit 4
Additional Notes: This permission is automatically inherited if Project Contributor/Administrator is set in the UI.
You must connect your service user before setting up a dbt Cloud project, as the service user's permissions determine which projects dbt Cloud can import.
A dbt Cloud account admin with access to the service user's Azure DevOps account must complete the following to connect the service user:
- Sign in to the service user's Azure DevOps account.
- In dbt Cloud, click Link Azure Service User.
- You will be directed to Azure DevOps and must accept the Microsoft Entra ID app's permissions.
- Finally, you will be redirected to dbt Cloud, and the service user will be connected.
Once connected, dbt Cloud displays the email address of the service user so you know which user's permissions are enabling headless actions in deployment environments. To change which account is connected, disconnect the profile in dbt Cloud, sign into the alternative Azure DevOps service account, and re-link the account in dbt Cloud.
Using Azure AD for SSO with dbt Cloud and Microsoft tools
If you're using Azure AD for SSO with dbt Cloud and Microsoft tools, the SSO flow may sometimes direct your account admin to their personal user account instead of the service user. If this happens, follow these steps to resolve it:
- Sign in to the service user's Azure DevOps account (ensure they are also connected to dbt Cloud through SSO).
- When connected to dbt Cloud, sign out of Azure AD through the Azure portal.
- Disconnect the service user in dbt Cloud, and follow the steps to set it up again.
- You should then be prompted to enter service user credentials.
dbt Cloud leverages the service user to generate temporary access tokens called PATs.
These tokens are limited in scope, are only valid for 5 minutes, and become invalid after a single API call.
These tokens are limited to the following scopes:
vso.code_full: Grants full access to source code and version control metadata (commits, branches, and so on). Also grants the ability to create and manage code repositories, create and manage pull requests and code reviews, and receive notifications about version control events with service hooks. Also includes limited support for Client OM APIs.vso.project: Grants the ability to read projects and teams.vso.build_execute: Grants the ability to access build artifacts, including build results, definitions, and requests, and the ability to queue a build, update build properties, and the ability to receive notifications about build events with service hooks.
Add your Microsoft Entra ID app to dbt Cloud
A dbt Cloud account admin must take the following actions.
Once you connect your Microsoft Entra ID app and Azure DevOps, you need to provide dbt Cloud information about the app:
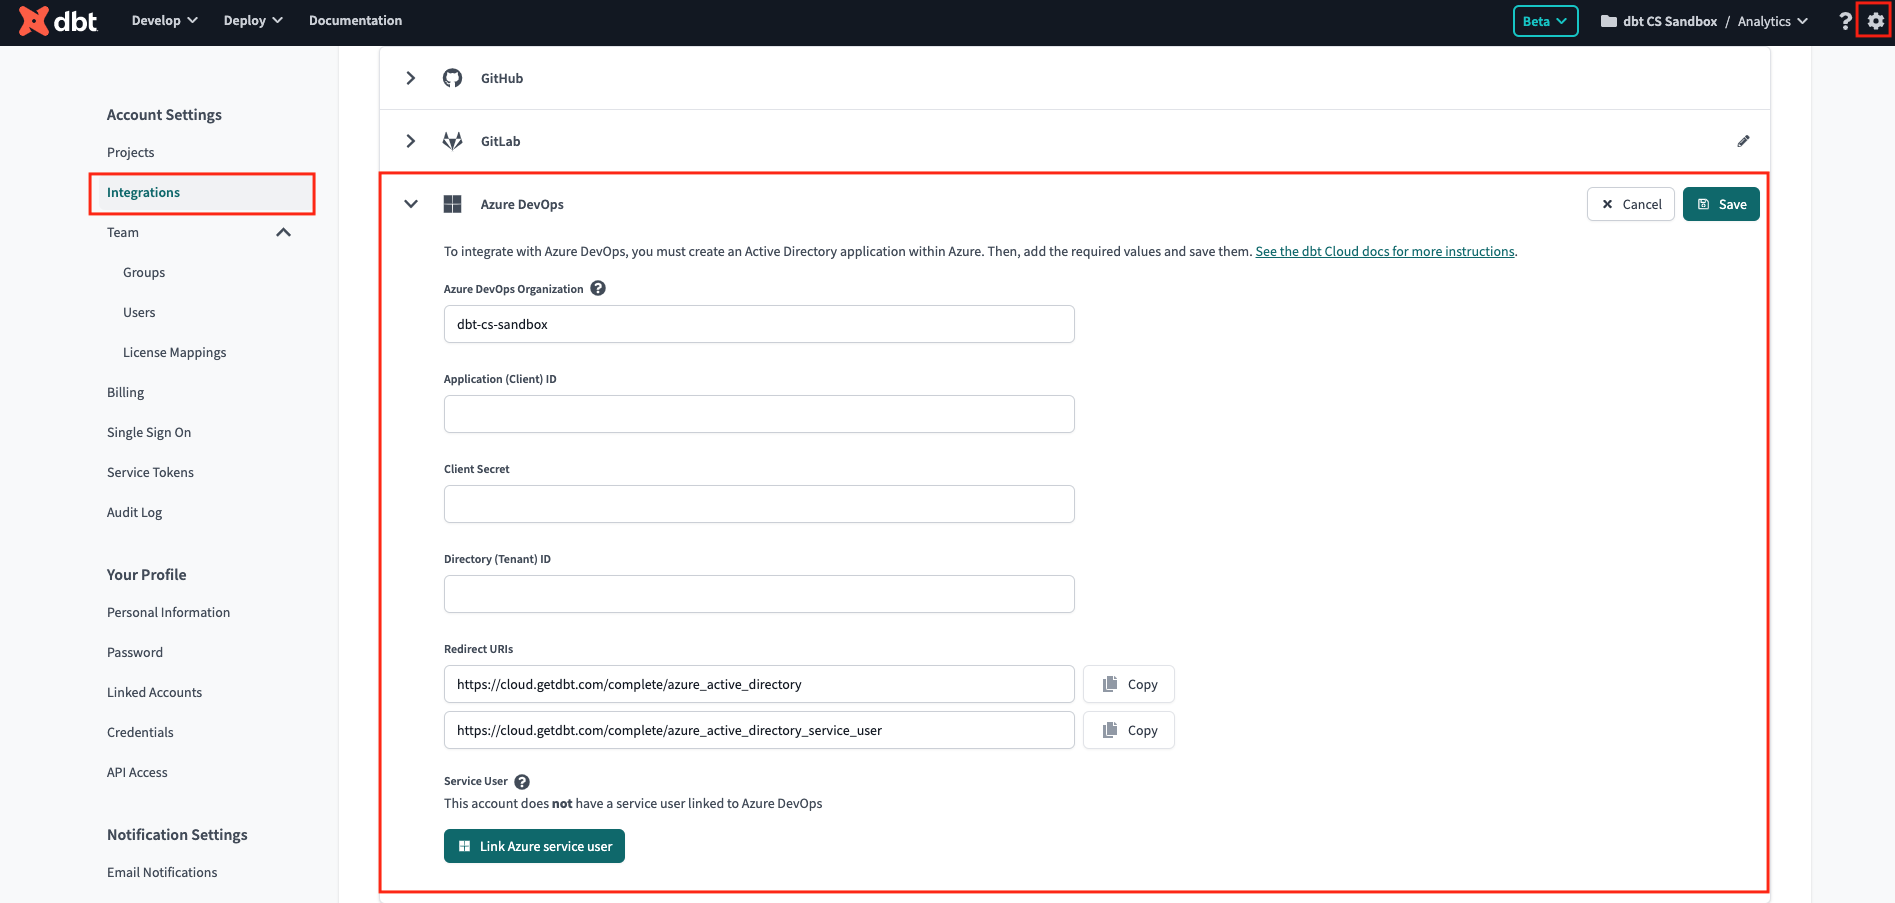
- Navigate to your account settings in dbt Cloud.
- Select Integrations.
- Scroll to the Azure DevOps section.
- Complete the form:
- Azure DevOps Organization: Must match the name of your Azure DevOps organization exactly. Do not include the
dev.azure.com/prefix in this field. ✅ Usemy-devops-org❌ Avoiddev.azure.com/my-devops-org - Application (client) ID: Found in the Microsoft Entra ID app.
- Client Secrets: Copy the Value field in the Microsoft Entra ID app client secrets and paste it in the Client Secret field in dbt Cloud. Entra ID admins are responsible for the Entra ID app secret expiration and dbt Admins should note the expiration date for rotation.
- Directory(tenant) ID: Found in the Microsoft Entra ID app.
- Azure DevOps Organization: Must match the name of your Azure DevOps organization exactly. Do not include the
Your Microsoft Entra ID app should now be added to your dbt Cloud Account. People on your team who want to develop in the dbt Cloud IDE or dbt Cloud CLI can now personally authorize Azure DevOps from their profiles.
